
Food Resupply Strategy for Our PCT Thru-Hike
Of top interest to hikers (and those living vicariously through us) is how in the world we keep ourselves fed throughout the 2660 mile Pacific Crest Trail. There are many, many ways to create a solid resupply strategy, but Sean and I have decided to do a combination of preassembled “mail drops” and buying food on the trail in nearby towns. With the help of our good friend the internet (including many blogs from others’ past experience), here is our plan for keeping ourselves fed on the PCT.
(Edit: If you’re interested in seeing how this plan worked out, click here.)
Mail Drops
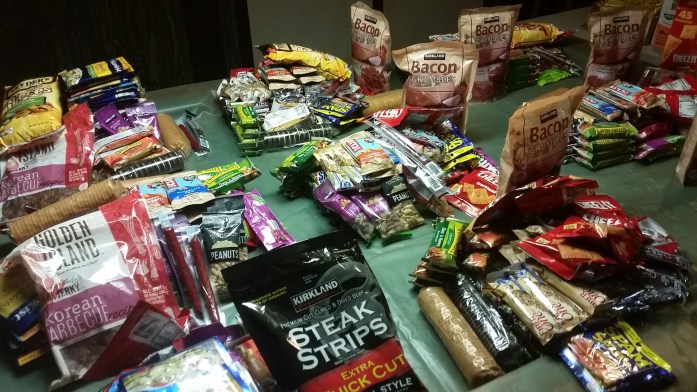
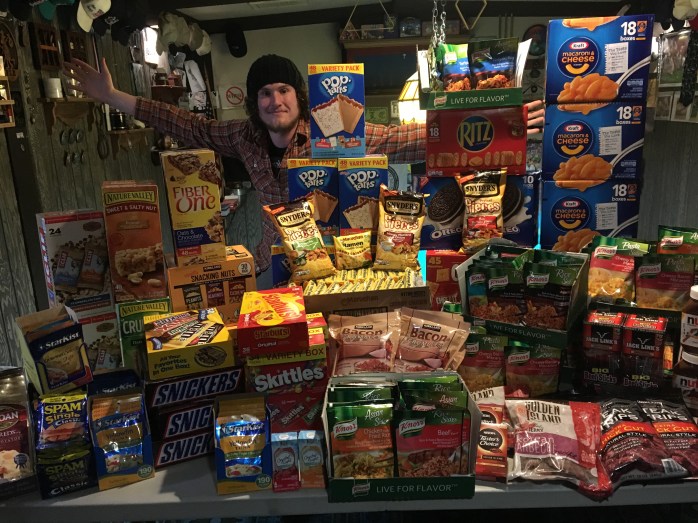
In case the name didn’t clue you in enough, mail drops are food resupply boxes that you either create before you hit the trail and have someone ship to you or create in a trail town and ship forward to yourself. Post offices and some businesses along the trail will hold boxes for you (some businesses will charge a fee). We have the most wonderful trail angels at home (Sean’s parents, thanks Mike and Jo!) that are willing to make trips to the post office when needed and ship out our precious boxes. While we were briefly in Indiana between trips, we did the daunting task of planning, shopping, and organizing 12 mail drops each with enough food for 2 people for 5 days.
 Why 12?
There are many online resources discussing PCT food resupply techniques. Two very important and helpful tools we used are Craig’s PCT Planner which helps you get a loose idea of where / when you’ll need to resupply and Halfway Anywhere’s incredibly thorough thru-hiker survey. (If you are planning a thru-hike of your own, definitely check these out.) With all the stats you can think of, Halfway Anywhere truly spoils the aspiring thru-hiker with data. Based on the survey, we went with the following 12 resupply points for mail drops (in order from south to north)
- Warner Springs (Desert)
- Kennedy Meadows (Sierra)
- Vermilion Valley Resort (Sierra)
- Sierra City (NorCal)
- Belden (NorCal)
- Crater Lake (Oregon)
- Shelter Cove (Oregon)
- Trout Lake (Washington)
- White Pass (Washington)
- Snoqualmie Pass (Washington)
- Stevens Pass/Skykomish (Washington)
- Stehekin (Washington)
These 12 points were highly recommended places to have a box waiting on you due to expense of resupply or lack of resupply options at the given way points. Halfway Anywhere’s survey of past thru-hikers also notes that the average thru-hiker resupplied 28 times. Creating these 12 boxes accounts for nearly half of our needed trail food.
How the Heck Do You Create a Mail Drop?
For first time long distance hikers, this can be a daunting question. Last year before hitting the Appalachian Trail, we did our best to assemble 5 boxes full of food we hoped we would like. For the most part, we did an okay job, but nothing teaches you more than experience. Now, we have a much better idea of what kind of food we actually like to eat out there and how much is enough to carry. There are lots and lots of ways to pack a mail drop and it really depends on your personal taste, diet, and amount of prep time you’re willing and able to put into it. A good guideline to stick to is 1-2 lbs of food per day. Many new backpackers overpack on food.
Dehydrating Your Own Food
Without the proper equipment and space available to us this winter, dehydrating our own food was out of the question for this trip. Dehydrating your own food (primarily dinners) can have major benefits such as having variety, saving money, and eating considerably more nutritionally dense meals. However, this adds countless hours of preparation in shopping, prepping, cooking, dehydrating, and packaging the meals. From what I can tell from fellow hikers, it is generally worth the time and prep to make other hikers drool over your homemade creation while we eat our hundredth Pasta Side or package of Ramen Noodles. Long story short, our mail drops do not include homemade dehydrated food, but for some other hikers, this form of prep is an essential step in creating their mail drops, especially for those on a specific food diet due to personal choice or allergy. Check out this article from Trail to Summit about making your own dehydrated food.
Our Favorite Trail Food
When picking out food for our mail drops we split our needs into three obvious categories: Breakfast, Snacks/Lunches, and Dinners.
Breakfast – Breakfast is easy. We each eat 1 package of 2 stupid PopTarts every single day. Each package has approx 400 precious calories. I’ve searched high and low in the grocery store for anything with comparable calories per weight to no avail.. 1 package of PopTarts each per day.
Snacks / Lunches – On the AT, we did a mix of actually eating a lunch and just snacking throughout the day. We ate things like…
- Snicker’s Bars
- Skittles
- Bars – Clif / Larabar / Various Granola Bars
- Jerky / Meat Sticks
- Summer Sausage*
- Tuna Packet with crushed up dry Ramen Noodles (and about half the flavor packet)
- Spam Classic Singles (packet)
- Ranch Corn Nuts
- Cheeze Its
- Nuts (we learned we really don’t like trail mix anymore)
- Cracker Sandwiches with Cheese or Peanut Butter
- Ritz Crackers
- Bagels with Cream Cheese*
- Packaged Cookies / Oreos
- Peanut Butter
- Nutella
- Tortillas*
- Block of Cheese*
- Avocados (occasionally)*
*these items were not included in mail drops due to shelf life
Dinners – We cook our meals together and typically mix items to bulk them up
- Boxed (well, zip lock bagged) Mac n Cheese + 1 Pasta Side (this helps make the mac creamy!)
- 2 Pasta Sides + 1 Ramen Noodle Package
- 2 Rice Sides + 1 Ramen Noodle Package
- 3-4 Ramen Noodle Packages
- Instant Mashed Potatoes + Ramen or Pasta Side (known as a Ramen Bomb)
- 1 Rice Side + Cheese + Avocado in a Tortilla
- Adding Tuna Packets, Chicken Packets, Bacon Bits, Spam Singles, and / or Hot Sauce makes everything better!
Don’t forget Leave No Trace etiquette!! Packing gallon and quart size Ziplocs will help with organization, trash, and odor. Pack it in, pack it out.

Cost
Food is easily the most expensive part of a thru-hike simply because you need so much of it! A long distance hiker will walk 15-25+ miles per day and can burn upwards of 4,000 calories. On trail, we ate around 2500 calories / day and went hog wild at restaurants in towns. On the AT, we spent $70-$90 per resupply for 2 people for 4-6 days. This year we spent $600 at Costco and $250 at Meijer to create 12 boxes (for 2 people for 5 days). That boils down to $71 per box and does not include the $25(ish) per box to ship. Mail drops tend to hang in the balance of cost vs benefit, especially without homemade dehydrated food. It is nice to have boxes that are already paid for and to know we won’t have to resupply from a gas station (which is the worst), but by the time you add shipping, buying in bulk doesn’t necessarily save you any money. For one mail drop for one person for 5 days, expect to spend $20-$40 and an additional $15-25 for shipping.
Fellow AT Hiker, Stretch, made a wonderful graphic on Appalachian Trials that beautifully sums up on trail expenses. (If you haven’t checked out Appalachian Trials yet and are planning a thru, go now!)
We’ve got about 2 weeks until takeoff and are beyond stoked. Even our time between Stratton and the PCT has been an experience of its own. Life is good, and I couldn’t be more grateful.
Work and Travel: Winter Work at a Ski Resort

Have the itch to go travel, but need to make money along the way? I spent the last four months working at Stratton Mountain Resort in Southern Vermont, hit the ski slopes in my off time, and even managed to save up for the next adventure. Here’s some insight to my experience working a winter at a ski resort.
Job: Waitress
Location: Stratton Mountain Resort, Vermont
![Fotor_145808139194185[1]](https://infinitegeography.com/wp-content/uploads/2016/04/fotor_1458081391941851.jpg?w=698)
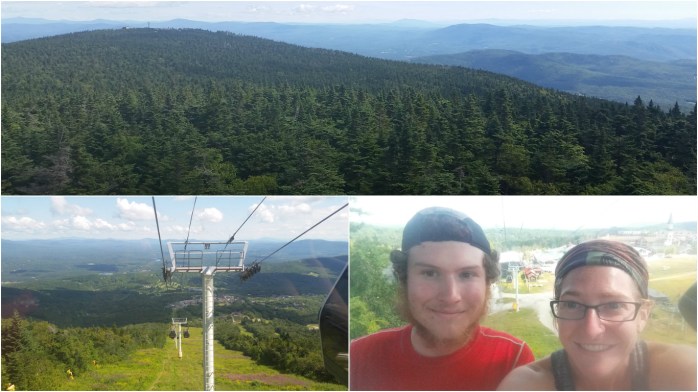
Winter at Stratton
Getting the Job
There are a few hundred ski resorts in the USA and somehow we managed to find ourselves in South Vermont. While working in Denali in 2013, Sean worked for an enthusiastic chef who went to work at Stratton the following winter. Basically, the job offer was on the table for work in Vermont when he was available. This year, it all just happened to work out. When we hiked Stratton on the Appalachian Trail, we went down the mountain and confirmed our jobs for the winter. In early August, we committed to the winter season beginning December 1st.
Sean and I both have extensive experience in the restaurant industry, and with a helpful reference on our side, securing our jobs proved simple. There are lots and lots of different types of jobs available at ski resorts including food and beverage, maintenance, retail, office work, massage, ski school, and much more.
Schedule
Both Sean and I averaged 40 hour weeks with possibility for overtime (holiday weeks were especially busy). We both typically had two (midweek) days off per week but occasionally worked 6 or 7 day weeks.
![20160301_183245[1]](https://infinitegeography.com/wp-content/uploads/2016/04/20160301_1832451.jpg?w=698)
Sean and his bartending mentor, Rit.
On our days off, we would visit nearby Manchester Center (the closest small town about a 25 minute drive away), relax with craft beer, or, of course, try to improve our skiing skills. Perks of working at a ski resort? Free lifts, $10/ day or $5/ half day rentals, and a free group lesson. I had skied 4 or 5 times as a kid, but there were no mountains involved. We were brand new to the sport and very excited to embrace a winter hobby. We only got out on the mountain about 4 times due to lack of snow in New England this year. However, we enjoyed our time and are looking forward to (potentially) returning.
![20160121_141324[1]](https://infinitegeography.com/wp-content/uploads/2016/04/20160121_1413241.jpg?w=698)
Money
What can I say, resort work has its perk$. As a career server, I was very, very pleased with my finances this winter. I felt beyond blessed to have gotten a job serving at the always high volume restaurant, Grizzly’s, “The bar at the base, baby.” We opened at 11 a.m. to the pounding of ski boots tramping up the stairs for bar food and beers. The next 8 hours were incredibly fast paced, somewhat hectic, and always packed with people soaking up every bit of their vacation. I’ll have server nightmares about my Saturday shifts for awhile, but of course, they were worth every penny.
![20160318_113654[1]](https://infinitegeography.com/wp-content/uploads/2016/04/20160318_1136541.jpg?w=698)
I worked with a team of all star servers who quickly became my friends. All ready missing you all!
Housing
Stratton Mtn has a small amount of employee housing, and since we secured our winter jobs so early, we were able to snag a room in Lift Line Lodge. Lift Line, a hotel built and probably also most recently updated in the 80s, was our home from December – March. I did my best to avoid the overly shared and rarely cleaned kitchen, ignore the sounds from other rooms through paper thin walls, and patiently wait on the one washer and dryer so many people needed to use. The good things? We lived on the mountain and never had to drive to and from work (especially helpful when it’s snowing). But a little research has shown that for $125 / week each we could have likely found an apartment or small house off the mountain. But then we might need 2 cars to accommodate different schedules…
So, yes Stratton (and many other resorts) has employee housing. The number of rooms does not meet the demand and many people find independent, seasonal housing near the mountain. The cost vs benefit analysis still hangs in the balance for me, but employee housing sure was convenient.
![20151220_110749[1]](https://infinitegeography.com/wp-content/uploads/2016/04/20151220_1107491.jpg?w=698)
Never got tired of my view from work.
Advice
If you have been considering jumping into the nomadic lifestyle via seasonal work, I highly recommend making the dive! There are various locations and positions available seasonally that can allow you to see more of the world and still be making money. Why not spend your summer in Alaska and your winter in Hawaii? Check out CoolWorks.org for a preliminary search of what’s out there. This website connected Sean to his job in Denali which led to a job offer in Vermont. Which actually led to a job offer catering Coachella in Southern California. A quick search of “resort” + “insert cool place you want to go” + “employment” is a great way to get an idea of what jobs they need to fill, if they have (or can help you secure) housing, when hiring is, etc.
![20160315_163804[1].jpg](https://infinitegeography.com/wp-content/uploads/2016/04/20160315_1638041.jpg?w=698)
Work and Travel: An Inside Look at Teaching English in Thailand
Do you have wanderlust but are lacking the funds for extended travel? I’m sure you know that there are many options to work while you travel and have an intensely rich cultural experiences. Check out Maggie’s (USA) story of living in Thailand and teaching English to finance the international travel experiences of her dreams.
Job: Elementary Teacher
Location: Bangkok, Thailand

How did you find out about your job?
I had a friend who was living and teaching in Thailand. When I knew I needed a change from my current job, I started researching more into teaching options in Thailand. My first job in Thailand I had secured by going through a program called GreenHeart where they were able to help me find a job and set me up with an agent. However, I got my current job while I was living in Bangkok through a common website for teaching jobs in Thailand called www.ajarn.com
What prerequisites / qualifications did you need to get your job?
Since I am teaching at an international school now, my school did require that I have some sort of college degree geared towards teaching/English. I have an education degree, but a few of my coworkers graduated college with a TESOL degree. However, at my previous school, all that was required was a college degree, and it definitely helped to have a TESOL certificate.

What is your work schedule like?
I usually work Monday-Friday, 7:45 am until 4 pm. I do have to work an occasional Saturday though from 7:45 am until noon, but this is just my school in particular that does this. During my work week, I only have about 20 hours of teaching per week. I do have to stay at the school during the hours I am not teaching, but I get to use this time to plan lessons, so I don’t have to take any work home!
How long have you been working for your company?
I have been living in Thailand for a year and a half, but I have been at my current job for the last year now.
Describe a typical work day (if there is such a thing).
I have a bit of a unique experience because I teach at a Japanese school in Thailand. Japanese culture is much more organized and structured. So here, I feel like I am teaching at a school somewhat similar to a school in America, at least more so than when I was at a Thai school. (Thai schools are absolutely chaotic, but that’s part of what made that an experience I won’t forget.)
While my days are always different, I come into work every morning and get my things ready. I generally teach 4-5 periods (45 minutes each) a day. I teach English to ten different fifth grade classes, in which I see each class twice per week. During my free periods, I spend my time creating lessons for the students. Since I get quite a bit of time for planning, I am able to make some really awesome lessons. I eat lunch at the school in the office with my coworkers. I always bring my lunch that I make at home, but you do have the option to order Thai street food. At 4 pm, I clock out and get to enjoy my time outside of work.

Do you feel like you have enough time off to explore your area?
Absolutely! Since I get free planning periods built into my daily work schedule, I never have to take home work. My time outside of work is my own time to do whatever I please.
Where have you traveled from your new home base?
I have been to Laos, Cambodia, Vietnam, Malaysia, and next week I am leaving for New Zealand for a month! Before the end of this year, I plan on also making trips to Myanmar, Singapore, and hopefully Sri Lanka and the Philippines. Southeast Asia is so cheap and traveling around is easy to do.

If you feel comfortable, please share your salary or salary range.
Teaching at a typical Thai school (even with a teaching degree) I made less than $1,000 a month. However, now I am teaching at an international school, and I make about the same of what my take-home salary was teaching in Indiana.
Do you feel like you are fairly monetarily compensated for your work?
Definitely. I am getting paid about what I got paid to teach in America, having to do about half the amount of work. I’m not saying that what I do is easy-breezy, but I am only teaching one subject versus teaching five. I also don’t have to worry about taking home any work which is such a nice thing!
Do you make enough money to cover living expenses? Enough to save?
Absolutely. Even when I was teaching at a Thai school and making about half of what I make now, I was still able to cover all my living expenses. You can live as cheaply or as comfortably as you’d like. I definitely live on the comfortable side – I currently live in downtown Bangkok in a condo with a kitchen and stove (uncommon for Thailand). I buy my own groceries to cook, which for Thailand can be considered more of a luxury since it’s actually cheaper to eat street food. I also still pay off my student loans back at home, and I still have money left over to save for whatever adventures and travels my heart wants to set off to do.

Are you on a contract or can you leave anytime?
I did sign a contract with my job. However, if I truly hated it here or an emergency came up, I could just pick up and leave. You’re not totally bound to something; it’s not like someone is going to come hunt you down for breaking your contract.
Does your job provide housing or help you find it?
Neither of my jobs here have provided housing. My first teaching job in Thailand, I was hooked up with an agent who helped me find housing. For my current teaching job, I had to find housing on my own, but my boss gave me names of a few places my coworkers lived. Finding housing in Thailand is so easy though and can be done in a day of just searching on foot or using various websites to help you get started.
Do you need a work visa and how difficult was that process?
You technically do need a work visa in order to work in Thailand, but your school usually deals with all that paperwork. I say technically because at my first job, I actually never got a work visa. This was a bit of a pain because it meant I was doing constant border runs to get a new ‘tourist’ visa. On a positive note though, it allowed me to travel to new countries!
Did you learn any Thai before heading to Thailand? Was it required that you learn?
I learned zero Thai before moving here. Maybe I should have tried to learn some, but it is definitely something you quickly pick up on while living here, especially if you are in more of a local area with not many tourists.

What about safety? Do you feel any more or less safe in Thailand as you do in the US?
For almost the whole time I’ve been living in Thailand, we have been in a military coup. Yet never once have I ever felt that I’ve had any real safety concerns. There has been one time where I actually got robbed. I left my purse unattached in my bicycle, and someone drove by and snatched it. However, since Thai people are so kind, and they all did everything they could, eventually I actually got my belongings back a few weeks later. I truly feel safer living in Thailand then I would living back in the States. As long as you use some common sense, you are fine. Not to say bad things don’t happen, but Thailand is a pretty safe country.
Do you have any advice for people wanting to make the plunge into working abroad?
Seriously, just do it! We are so lucky to have so many vast opportunities like this available to us. Being a native English speaker allows us an advantage to go almost anywhere to teach. I think that if it is something you are considering and have had in the back of your mind for a bit now, you are going to regret not making that choice more so than if you just did it and found it wasn’t for you. Do your research a bit ahead of time to look into cities/countries that would best suit you. Learn more about the culture so you can be more aware of different customs. Be open-minded, and enjoy the ride! I spontaneously decided to move to Thailand, and it was the best decision I’ve ever made.
Have you enjoyed your work / travel experience? Has it changed your life?
I have absolutely loved my time here so far, which is probably a good thing since I still have another year left on my contract. This experience has been one of the best decisions in my life, and I honestly cannot imagine still living back in America. Living abroad opens your eyes to a whole new way of life. You meet the most incredible people throughout your journey, and you learn what truly is important in life. Fair warning though: traveling/living abroad is definitely addictive. 😉 I am already looking into where I want my next adventure to be.
What has been less enjoyable? Are there things you would do differently? What’s the hard part?
If I could do things differently, I don’t know if I would necessarily have went through a program. Seeing how things work now, I could have done it on my own, but it was nice to have that comfort of having help along the way for my first big move abroad.
I think one of the hardest things about being abroad is having people come and go out of your life. Most expats don’t plan on living in one place forever, so the friends you meet tend to be temporarily physically in your life, which can be really hard. I have had to say ‘see you later’ to so many people I have lost track. The good news is though we live in a very technology based era where things like Skype exist so you can stay in touch with them and all your friends/family back home. If it weren’t for this, I think things would be much more difficult.
Do you have a blog?
Yes! I have been pretty terrible with keeping up on it is as much as I would like to, but it something I am working on being more up to date with!
http://sugarmagnoliaxo.tumblr.com/

Thanks so much to Maggie for sharing your experience!
Do you have a life changing work/travel experience that you’d like to share? I’d love to hear more in the comments!
Follow Along
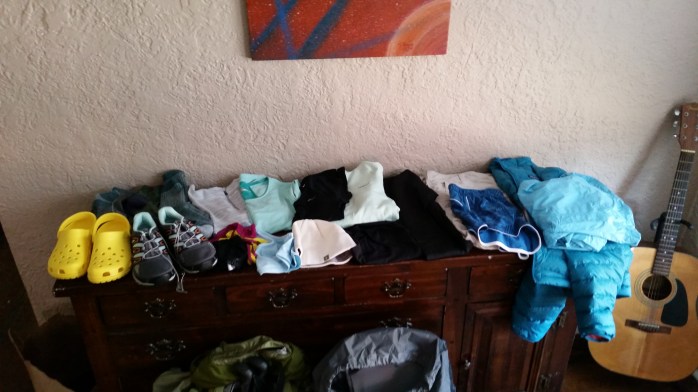
Pacific Crest Trail Thru-Hike Ultralight Gear List
After countless hours of research and organization, I present to you our 2016 Master PCT Gear lists…
Just a few notes.
- Shoutout to Outdoor Gear Lab for making gear research easy. They’ve reviewed, tested, and compared it all for you.
- The price listed is the MSRP, not necessarily what we paid. We found many sales, had some of this gear from last year, and got a bunch of REI gift cards for Christmas. Our families rock!
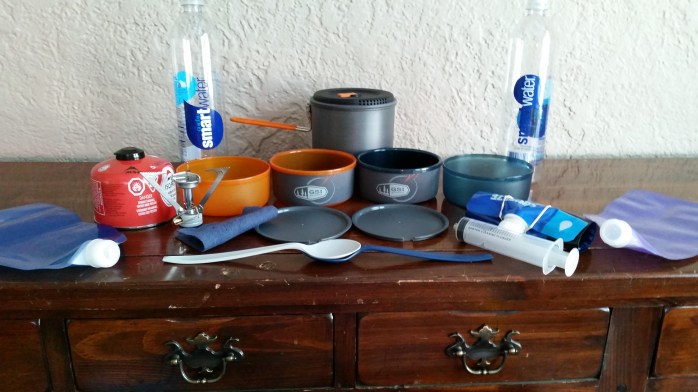
- The “Variable Items” list are things we will be using for part of the trip. We intend to start out with our tent stakes, poles, rainfly and a reflective emergency blanket in the desert to create our oasis. When we hit the Sierra, we will have the tent body shipped to us, and the all weather blanket will be shipped home. Similarly, we are going “stoveless” in the desert and will get our stove and cookset at Kennedy Meadows before entering the Sierra.
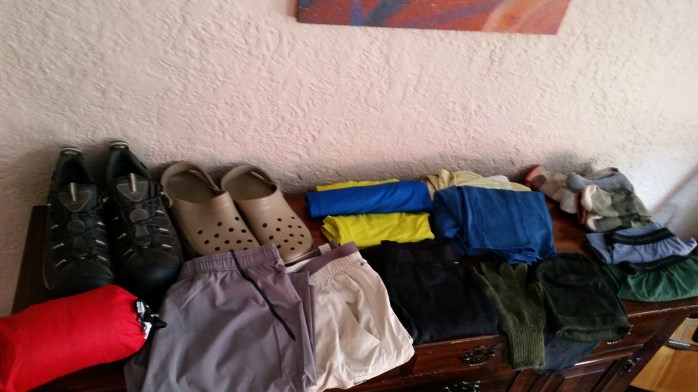
- I did not include our hiking outfit because it won’t be carried (and we still need to purchase it 😉 ). These items include…
- Synthetic Tee / Tank
- Lightweight Long Sleeve Collared Button Up Shirt (desert only)
- Wide Brim Sun Hat
- Light Weight Hiking Pants (will be swapped for synthetic running shorts)
- Exoficcio Underwear
- Darn Tough Socks
- Dirty Girl Gaiters
- Buff (Bekah)
- Sports Bra (Bekah)
- We also LOVE our Leki trekking poles. I will be using the same ones from the AT. Sean sent his in under warranty, and Leki sent him a brand new pair for the PCT. Thanks Leki!! Sean has the Corklite Aftershock ($160), and I have the Jannu ($120).
Questions? Comments? Concerns? If you’re heading out on a long distance hike, share your list in the comments below!! Happy hiking!!
Pacific Crest Trail Thru-Hike Gear: Choosing Our Big Three
Well, we’re still about 2 months away from taking our first steps on the Pacific Crest Trail. But, rest assured, almost all of our gear has been selected and purchased. We are very, very excited to be hiking the PCT in ultralight (UL) fashion.
We are working on a very intense and detailed spreadsheet of every last item we will carrying, but here’s an article on our “Big Three” ie the three heaviest, most important, and costly pieces of gear we’re carrying – packs, sleeping bags, and tent.
Let’s start with the packs.
After many hours of research, Sean aka BigFoot decided to get his pack from ZPacks. ZPacks is a small company making a big mark on the ultralight backpacking scene. Products from this company are handcrafted in the USA and designed for long distance hikers BY a long distance hiker. Owner and designer, Joe Valesko, has hiked nearly 10,000 miles on three different continents and has created some magnificent products to help you (literally) follow in his footsteps. Thanks, Joe!
Sean chose the Arc Blast Backpack 
- 60 L total capacity
- Up to 35 lbs weight capacity
- Waterproof
- 21.9 oz
- $370, MSRP (added optional hipbelt pockets)
Convinced by a significant discount in the form of a Pro Deal, I went with Hyperlite Mountain Gear (HMG) for my pack. HMG has developed a reputation among ultralight backpackers for its quality USA handmade products and exceptional customer service. This company was also created by and for backpackers and was among the first companies to design a high end ultralight pack.

I chose the 2400 Windrider in Black (150 Denier).
- 40L internal capacity
- 10 L external capacity
- 20-40 lbs weight capacity
- Waterproof
- 29.6 oz.
- $310 MSRP
We are very excited to put these two excellent brands to the test side by side. One last thing I will say about packs is that we LOVED our Opsrey packs on the Appalachian Trail. They were comfortable, spacious, and the company had outstanding customer service when I needed them. Osprey was easily the most popular brand on the trail, and the only other brand I recommend for those of you not going ultralight!
Sleeping Bags, well actually, QUILTS!
We both chose the same company and product for our new sleeping bags quilts. We are still waiting to receive our precious new sleeping cocoons from Enlightened Equipment. This company was yet another that began when the owner decided to create his own sleeping quilt to suit his desire for high quality and ultralight weight. All products are hand crafted in the USA and custom built using cruelty free down feathers.
We both chose the Enigma bag and customized it to our needs.
- 20° F temperature rating
- Sewn foot box
- No zipper or hood (saves weight)
- 900 down fill
- Mine = 16.5 oz
- His = 19 oz
- $325 MSRP (each)
Lastly, OUR NEW HOME!
Well, for about 5 months anyway. For our shelter, we went with Big Agnes. A very popular and big company in the outdoor industry, we chose the Big Agnes Copper Spur UL 2 for some very important reasons
- Freestanding tent (ie has its own poles / doesn’t use trekking poles to stand up)
- 2 doors and 2 vestibules (CRUCIAL for couples)
- 50 oz (+5 oz for the footprint)
- $425 MSRP (+$70 for the footprint)
Part of the joy of sharing a tent is splitting the weight. We will also save some weight in the desert section of the PCT by only carrying the poles, stakes, and rain fly as the tent body will not be necessary. We will have the tent body mailed to us before we enter the High Sierra.

BONUS – Sleeping Pads
I guess that makes this the “Big Four,” but a very important item worth mentioning is our new Thermarest Sleeping Pads. We both went with the NeoAir XLite.
- Mine = 8 oz (torso length), $130
- His = 12 oz, $160
So if you’re keeping track at all, with our big four and splitting the tent…
My pack + quilt + 1/2 tent + pad = 81.6 oz (5.1 lbs), $1,015 (woahhh)
His pack + quilt + 1/2 tent + pad = 80.4 oz (5 lbs), $1,105 (:-O)
…and this is us (thanks Imagr)

Why I’m Thru-Hiking The Pacific Crest Trail

Just over a year ago, I sat down with all of my nerves, anxiety, and excitement and scribbled out my reasons for setting out on my thru-hike of the Appalachian Trail. I had very little idea what I was getting into, and even coming up with the reasons why I was heading out for a 2,189 mile hike was difficult. The AT, in many inexplicable ways, called to me. Now, the return to nature is loudly yelling in my ear, and the Pacific Crest Trail awaits.

It’s looking like our start date for the PCT will be sometime in the first week of May. Unlike many hikers and our formal selves, we haven’t picked out and pined over a specific date. Why? Well, life is sometimes spontaneous, and we recently received a job offer too good to pass up. We intended to begin the PCT April 18, but now, it looks like we will be spending the entire month of April working catering for the one of the country’s largest music festivals conveniently located in southern California, Coachella. Nice.
So, why after bruises, blisters, rain, hail, Lyme Disease, Achilles Tendinitis, sunburn, and the mental monotony of walking every day would I want to put myself through all of that again? Why am I hiking the Pacific Crest Trail?
1. To see even more of this incredibly beautiful and diverse country. Outside of being long footpaths, the AT and the PCT actually have very little in common. While I will always have a very special place in my heart for the Appalachian Trail, I did grow somewhat tired of the monotony of the “green tunnel.” On the AT, you are always in the woods with occasional mountain views and bald spots. The PCT, however, boasts stunning views most of the time and traverses contrasting landscapes from the desert of southern California to the High Sierra to old growth forests to the Cascades. Sunrises, sunsets, and constellations will not be an occasional luxury to witness at the “perfect spot” as they were on the AT. The United States is a natural treasure and playground. I’m nothing but blessed to be travelling through these contrasting environments on foot.

2. To get away from a society I don’t feel like I belong to. After experiencing the joys of “trail culture,” it is truly difficult to adjust back into what people call “real life.” Things that just don’t work for me: racism, bigotry, consumerist culture, not recycling, single use cups, food waste, society’s lack of empathy, taking advantage of people, throwing your flipping cigarette butts on the ground. UGH! And even mentioning some of these things makes people upset and defensive. Whatever. I’ll run back to the woods now.

3. I adore the challenge almost as much as the reward. You never would have heard me say that over the summer while I was hiking, but damn do I love climbing mountains. And, to me, there is just nothing else like it. The pride you get from a job well done, the joy of the views from the mountaintop, the endorphin rush from the rough workout, knowing that you pushed through when you had so little left to give…

4. To live outside again. Even though my emotions sometimes corresponded with the sour weather (sorry, Sean), living outside is a beyond words experience, and I cannot tell you how excited I am to be surrounded by the beauty of nature 100% of the time once more. It’s definitely not for everyone, but I felt so at home among the trees, the sky, the rocks, the mountains.
5. Because. I. Can. Physically, emotionally, financially, mentally – I can walk 2,650 miles from Mexico to Canada. And you better believe, I will.

It Doesn’t Have to Be a Thru-Hike
Here I am in beautiful south Vermont enjoying the ski season while working at Stratton Mountain Resort, yet still decompressing my Appalachian Trail thru-hike. And completely consumed with my upcoming Pacific Crest Trail thru…
Since I left in July of 2014 for my backpacking trip through Latin America, I haven’t stayed in one place for more than 5 months. For me, it’s an incredible life style – one I know that won’t last forever and one that I am trying to enjoy every minute of while it’s here. Of course there are many ups, but that doesn’t mean there aren’t downs. Just like any other life path, well, life happens. But, for now, being nomadic works for me. The bills are paid, money is made when it needs to be, and well, life keeps going.
But I understand that this lifestyle doesn’t work for everyone and for a million different reasons. It is an often occurrence for people to listen about my travels for a couple minutes with awe, then I can see them snap back to their reality and quickly offer why they’d love to do what I am able to, but for x, y, an z reason (typically related to career, family, and health) they just can’t take off for months at a time and travel.
I guess I’m writing today for two reasons.
Just because I travel does not mean I think less of your life adventure.
It really bothers me when people get upset or defensive about their life to me after hearing my stories. “Oh that’s so incredible, I wish I could do that, but I have a two year old, and he isn’t going to raise himself!” A slightly sad and wishful look crosses their face, then fades.
You’re raising a child? Multiple children!? I know in our society, child raising comes with much more criticism than praise, but all you parents out there give yourself a hand. You’re in charge of an additional human, which may very well have just waltzed into your life nine months after a child was the furthest thing from your mind, and BOOM – now you’re expected to make this human a perfect member of society. If that’s not an adventure, I truly don’t know what is.
Same goes for those of you out there getting your education. Many people are dedicating their time for a career. Um, society needs you. Whether you’re working at a hospital, school, a Hershey’s plant making all the yummy things, developing new clean energy technology, waiting tables at a restaurant, etc., Thank YOU for going to work or school today.
If you know me (or another bubbly traveler in your life), just remember, this lifestyle works for me, I love it, but I don’t think less of your life path. I want to share my travel photos with you. I also want to see the pictures of your family, or the last concert you went to, or your graduation pictures. There’s no hierarchy or competition.
It DOES NOT have to be a thru-hike.
Or a 5 month, country hopping backpacking trip. Or whatever.
The idea that you have to hike the entire Appalachian Trail to be an epic adventurer or successful hiker is tragically fabricated. As you may know, many of those who set out to walk all 2,189 miles of the AT do not finish the hike. Some complete 30 miles, 300, 800, 1000, 1400, 1800 and go home feeling defeated. They didn’t walk the whole thing, and somehow their accomplishment is now diminished.
This whole thru-hiking thing, to me, has blown totally out of control. If you go to a trail to hike, and you hiked… isn’t that enough? What does the distance have to do with anything at all? I personally met hikers that left after 1,000 miles. And they left feeling guilty and inadequate.
This IS NOT the point of hiking!! No one who walks 1,000 miles should feel guilt after doing so. That’s just complete rubbish.
So to the many, many people that have said to me, “I wish I could do that one day, but I can’t because of ____,” just know that in no way do you have to complete a 2,189 mile to feel accomplished and get many of the same experiences that I had on the trail. Can you get away to nature for a couple weeks? 5 days? How about 2?
Do you want the satisfaction of completing a trail, but don’t have 5-6 months to dedicate to doing so? Why not check out the Colorado Trail (480 miles), the John Muir Trail (210 miles), or the Long Trail (270 miles) to name just a few?
There are hundreds of thousands (millions?) of miles of hiking trails in this country with countless mountains to climb, lakes to visit, and endless sunsets to see. Just because you can’t dedicate yourself to an extreme long distance hike, does not mean you shouldn’t go out and hike at all!
The point of all this rambling is this:
- I understand that not everyone is able to travel in the way that I do. I love my lifestyle and am willing to help anyone achieve a similar path because it is within more people’s grasps than they probably believe.
- Life is an adventure with infinite paths.
- Get outside more often. You’ll be glad you did.

Appalachian Trail 2015 Slideshow

After much delay, I have finished our slideshow from the 2,189 miles on the Appalachian Trail. I know 12 minutes is infinite time in the internet world. But, if you’d like to see, here’s our experience in pictures on the AT.
It just about brings me to tears every time I watch it (which is far too frequently). We are beyond stoked to start the Pacific Crest Trail in April.
Cheers!!
Our Appalachian Trail Thru-Hike 2015 Gear List

This is the final list, weight, and cost of all the things we started with on our Appalachian Trail thru-hike. Although we are typically super budget conscious, we realized the importance of investing in our gear.
Let’s be honest. Sean is the gear guru. Watching Youtube gear reviews is a strange form of hell for this one. So, without further ado, may I present our 2015 Appalachain Trail Thru-Hike Gear Lists…
His
Pack – Osprey Atmos 65 – L – 3 lbs 10 oz – $187
Pack Cover – Sea to Summit (Large) – 4.6 oz – $45
Sleeping Bag – Marmot Helium (Long) 2 lbs 6 oz – $240
Sleeping Pad – Therm-a-Rest Prolite L – 1 lb 6 oz – $110
Trekking Poles – Leki Corklite Antishock – 1 lb 4 oz – $160
Headlamp – Black Diamond Cosmo – 3.2 oz (inc. batteries) – $30
Stove – MSR Pocket Rocket – 3oz – $40
Cook System – GSI Dualist – 1 lb 6 oz – $65 (inc 2 bowls, 2 cups, 1.8 L cooking pot)
Spoon – REI Campware (Long) – .5 oz – $2
1 L Water Bottle – Empty Smart Water Bottle (empty) – .5 oz – $1
Sea to Summit Ultra-Sil 20 L dry sack (empty) – 1.8 oz – $25
Waterproof Watch – $25
Lightweight basic pocket knife – 1 oz – $5
Small Microfiber Pack Towel – $15
iPhone 5 and charger (prepurchased)
Therm-a-rest Z-Seat – 2 oz – $15
Rain Jacket – Patagonia Torrentshell (Large) 13 oz – $130
Down Jacket – Patagonia Down Sweater (Large) 13 oz – $230
Clothing – all in a 13 L Sea to Summit stuff sack – approx 2.5 lbs (some will be worn, some will be carried) – approx $450
Hiking Pants – Colombia
2 Synthetic T-Shirts (North Face and Colombia)
1 Long Sleeve Patagonia Capilene
1 Quarter Zip Patagonia Capilene 4 Thermal Base Layer
Patagonia Capilene 4 Thermal Tights
2 Pair Darn Tough Hiking Socks
1 Pair Smartwool Camp Socks
1 Pair Hiking Shorts
2 Exoficcio Underwear
Smartwool Beanie
Outdoor Research Balaclava
1 Pair Gloves
Bandana
Shoes – Keen Targhee II – $125 ( x3 = $375)
Camp Shoes – Crocs – $35
Approx Weight = 21 lbs (inc half tent)
Total Cost = $2270 (inc half tent)
Pack – Osprey Aura 50 – 3 lbs 2 oz – $210
Pack Cover – Sea to Summit (Large) – 4.6 oz – $45
Sleeping Bag – North Face Synthetic 30 degree – 1 lb 6 oz – $120
Silk Sleeping Bag Liner – 4 oz – $80
Sleeping Pad – Therm-a-rest Pro Lite Women’s -1 lb – $79
Trekking Poles – Leki Women’s Jannu – 1 lb – $120
Headlamp – Black Diamond Cosmo – 3.2 oz (inc. batteries) – $30
Bladder – Platypus 1 L – 1.2 oz (empty) – $8
Water Filter – Sawyer Squeeze – 3 oz – $40
Spoon – REI Campware (Long) – .5 oz – $2
1 L Water Bottle – Empty Smart Water Bottle (empty) – .5 oz – $1
Sea to Summit Ultra-Sil 20 L dry sack (empty) – 1.8 oz – $25
AWOL AT Guide Book – $15
Waterproof Watch – $20
Light Weight Basic Pocket Knife – 1 oz – $5
Samsung Galaxy s5 and charger (prepurchased)
Small Microfiber Pack Towel – $15
Therm-a-rest Z-Seat – 2 oz – $15
Odds and Ends (toothbrushes, toothpaste, Dr. Bronner’s soap, Multivitamins, ibuprofen, moleskin, bandages, hand sanitizer, toilet paper, hairbrush, small notebook and pen, handwipes, ziplock bags for garbage) – $35
Rain Jacket – Marmot Precip – 11.4 oz – $99
Down Jacket – Patagonia Down Sweater Women’s – 12.2 oz $229
Clothing in a Sea to Summit Stuff Sack – approx 2 lbs – approx $450
Hiking Zipoff Pants
Patagonia Capilene 4 Thermal Tights
Patagonia Capilene Base Layer
1 Synthetic Long Sleeve Shirt
2 Synthetic T Shirts (Nike and Marmot)
2 Pair Darn Tough Socks
1 Pair Smartwool Camp Socks
2 Exoficcio Underwear
1 Exoficcio Sports Bra
Smartwool Beanie
Balaclava
1 pair gloves
Bandana
Shoes – Salomon X-Scream Trail Runners – $120
Camp Shoes – Crocs – $35
Approx Weight = 16 lbs (inc half tent)
Total Cost = $1963 (inc half tent)
Ours
Tent – Kelty Salida 2 – 4 lbs 9 oz – $170
Total Combined Retail Cost = $4233

Wow… $4233. Note, these are the approx retail value of these items; not necessarily what we paid. We scored some amazing deals, and we got lots of love from our families for the holidays in the form of REI gift cards. At the end of the day, we consider our gear an important investment and would rather spend a little extra money to carry a little less weight. It may seem like a lot of money; but, honestly, if you can’t afford the gear, wait until you can. Keep in mind that this is your housing and clothing expense for 5+ months.
Material: The First Step to Understanding Backpacking Gear

Wandering off into the woods with nothing but essentials on your back is a glorious and wonderful thing. But before you hit the trail, you have to decide exactly what items you’re going to carry and what kind of bag you’ll be putting them in. Picking out those items can be overwhelming at best and a true nightmare at worst. When I began gear research for my AT thru-hike, I had no idea where to start. Now, knowing slightly more about that precious and expensive gear, I can at least help you learn the first important step: understanding materials.
Say goodbye to cotton.
That includes cotton shirts, denim, sweatshirts, blankets, canvas tents, hats, etc. Cotton is not the fabric of this life.
Instead, say hello to synthetics.
Synthetics (polyesters) are used in many pieces of backpacking gear such as clothing, tents, backpacks, and stuff sacks. Synthetic fibers are more durable than natural fibers and can stand up stronger to sunlight, moisture, and human oils.
Synthetics are known for their moisture-wicking properties. Basically, the material draws the moisture (ie sweat) from the body to the outside surface of, say, the shirt. From there, the moisture can evaporate more easily keeping you dry.
Synthetics are also used as an insulator in sleeping bags. Cotton and wool sleeping bags are out for backpacking. They are much too heavy and bulky. Instead, choose between synthetic or down. Synthetic bags will be significantly cheaper than down and much easier to wash, but they will also be considerably heavier, bulkier, and take up a majority of your pack space.
So let’s talk about down.
Down is the soft layer of fluff underneath the outer layer of feathers of a goose or duck, and it creates the most luxurious insulator for jackets and sleeping bags. Seriously, you could convince me that down feathers came from angels’ wings. Down is easily the most expensive material used in the backpacking world, but it is typically well worth the price. Down is beneficial to backpackers in that it is extremely compact, comfortable, extra light weight, and will keep you particularly warm.
Dyneema for all your ultralight desires.
Dyneema (formerly Cuben Fiber), also a synthetic material, is primarily used in ultralight backpacks, tents, tarps, and stuff sacks. This creatively designed material is incredibly durable, lightweight, and waterproof. If you want to go ultralight (base weight under 15 lbs.), cuben fiber is for you.
Keeping cool in Merino Wool.
Merino wool is another option for clothing. Unlike synthetic material, wool actually traps moisture keeping you cool on those unbearably hot days. The natural fiber also has impressive odor neutralizing properties. Deciding between wool and synthetic is simply personal preference. Wool keeps you cooler, but also is more expensive. On this one, I favor synthetics just to save a few bucks.
