
How to Make Dehydrated Backpacking Food

We are oh so excited to begin the 486 Mile Colorado Trail in just seven days! This year, we upped our trail food and nutrition diet by making our own dehydrated backpacking meals!
How it Works
- Prepare and Cook Food
- Spread food onto dehydrating trays in thin layers. If your food would drip through the trays, use parchment paper as a tray liner.
- Dehydrate. Dehydrators come with instructions that indicate what temperature to use for certain foods as well as a time estimate.
- Wait! Most of our batches took 10-15 hours to be fully dehydrated.
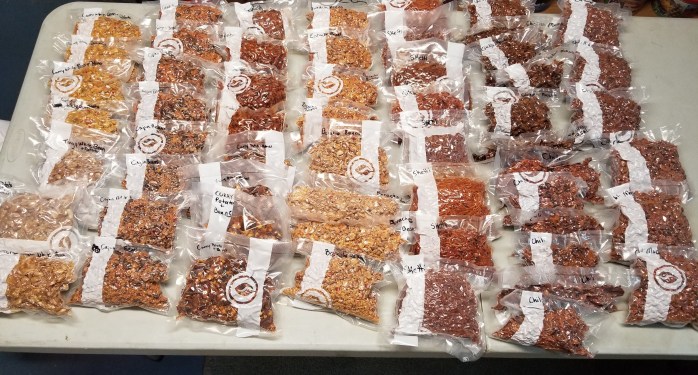
- Vacuum seal meal portions.
- When on trail, re-hydrate with water and heat.
- Enjoy a nutritious, home cooked meal at a fraction of the price of freeze dried alternatives.
What You Need
- Food Dehydrator
- Parchment Paper
- Prepared Meal
- Vacuum Sealer and Bags
- Time!!
- A Trail 🙂
Dehydrating your own food is actually quite simple, but it does take quite a bit of time. It took us about 5 weeks to create 57 dinners for two, and we used two dehydrators! If you are making a large amount of meals, start well in advance.
Portions
We found that filling a 6 Qt Stock Pot mostly full would yield four dinners for two (8 portions). We measured out 1.5 cup portions and spread one portion per tray in thin layers. I measured the amount of food after it had been dehydrated, and noticed the volume changed by about 3/4 cup. On trail, I will start re-hydrating with less water than anticipated and add until I achieve the desired consistency.
What to Make
You can cook and dehydrate basically whatever you like. Our meals tend to be made of any bean (white, garbanzo, black, kidney, etc) and finely chopped vegetable in some sort of sauce. We added cooked pasta to some meals, and others we intend to add minute rice cooked in the back country.
While you can cook and dehydrate just about anything, here are some things to avoid:
- Oily Foods
- Nuts and Seeds
- Avocado
Note: Any food you put into your dehydrator must be fully cooked beforehand. So if you are making beans, canned beans are fine, but a dried bean must be fully cooked before it can be dehydrated.
Meal Ideas
We made 100% vegan dehydrated meals for the trail to fit our diet. I can’t speak from personal experience with animal products, but there are many sources that indicate that meat dehydrates just fine. I would assume that meats lower in fat and grease would dehydrate better than greasy meats. All of the meals below we made without any animal products.
If you’d like to know more about backpacking on a vegan diet, check out a full article on vegan backpacking here.
Note: These are not formal recipes. I included the ingredients and seasonings we use so that you can modify quantities to your liking. For us, it worked well to fill a 6 Qt Stock Pot mostly full which yielded 8 – 1.5 cup portions. I recommend making thicker soups with little broth. I also recommend over seasoning for a better flavor once the meal is re-hydrated on trail.
Powerhouse Breakfast
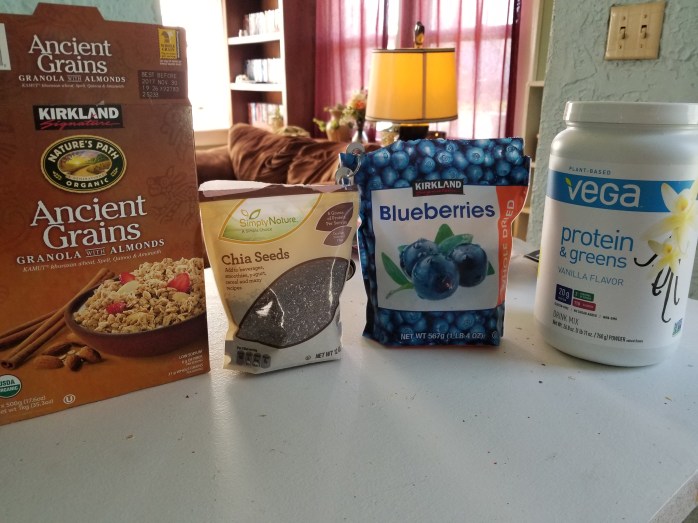
Ingredients
- 1/2 cup Granola
- 1 tbsp Chia Seeds
- 2 tbsp Vegan Protein Powder
- 2 tbsp dried fruit
Add all ingredients to vacuum bag and seal. On trail, add 1/2 cup water. Approx 400 cal and 17 g protein per serving as is. After you add at water and the powder is dissolved, we like to add a spoonful of peanut butter for extra nutrition and to cover up the taste of the protein powder.
Chili / Chili Mac
![IMG_20170529_124638_258[1]](https://infinitegeography.com/wp-content/uploads/2017/06/img_20170529_124638_2581.jpg?w=698)
Ingredients
- Canned Beans (Chili, Kidney, Black), drained
- Canned Tomatoes (Crushed, petite diced, tomato paste)
- Finely Chopped Yellow Onion, Bell Pepper, and Garlic
- Frozen Corn
- Seasonings: Chili Powder, Cumin, Cayenne Pepper, Crushed Red Pepper, Garlic Salt, Salt and Black Pepper
- For Chili Mac, add cooked elbow macaroni
Saute onion and bell pepper in a little vegetable stock, add garlic last. Add all other ingredients and seasoning.
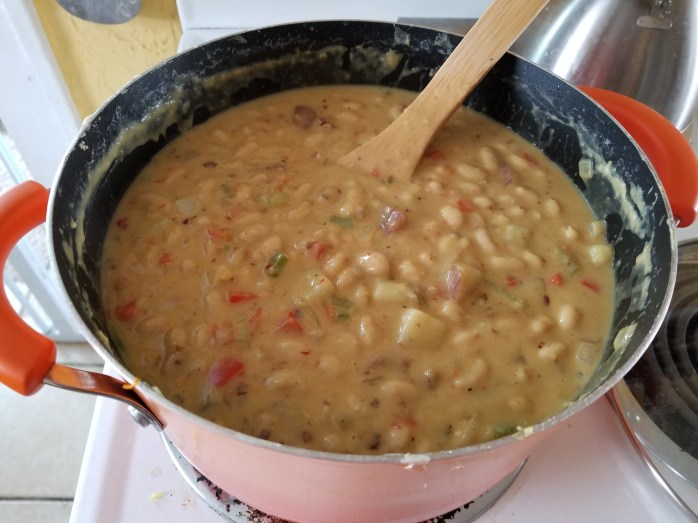
Boracho Beans
![20170603_120421[1].jpg](https://infinitegeography.com/wp-content/uploads/2017/06/20170603_1204211.jpg?w=4032)
Ingredients
- Pinto Beans, drained
- Finely Chopped Onion, Red Bell Pepper, Garlic
- Canned Chipotle Peppers (Would not recommend using the whole can! 1 or 2 peppers will do it.)
- Dash of White Vinegar
- One Light Beer
- Tomato Paste
- Seasonings: Salt and Pepper
Lightly saute onion and bell pepper in a little vegetable stock, add garlic to saute last. Add all other ingredients.
Chickpea Masala
![20170603_194231[1]](https://infinitegeography.com/wp-content/uploads/2017/06/20170603_1942311.jpg?w=698)
Ingredients
- Green chiles (jalepeno), Garlic, Cilantro
- Finely Chopped Onion
- Canned Chick Peas, drained
- Stewed Tomatoes
- Coconut milk
- Seasoning: Tumeric, Cumin, Garam Masala, Salt and Pepper
Combine chiles, garlic, cilantro, and stewed tomatoes in a food processor. Transfer to stock pot and add all ingredients.
Tangy Potato and White Bean Soup

Ingredients
- Potatoes
- Canned White Beans, drained
- Minced carrot, red onion, and garlic
- Apple Cider Vinegar
- Maple Syrup
- Seasonings: Salt and Pepper
Simmer carrot, red onion, and garlic in 3 parts water, 1 part vinegar until onions are translucent. Add a dash of maple syrup. Set Aside. Boil potatoes in salted water until soft. Combine half cooked potatoes, half white beans, and the onion mixture you made into a food processor. Blend until smooth. Combine mixture with more cooked potatoes and white beans. Add salt and pepper to taste.
Curry Potato and White Bean Soup
Ingredients
- Potatoes
- Canned White Beans, drained
- Coconut Milk
- Finely Chopped Onion, Bell Pepper, and Garlic
- Seasonings: Curry Powder, Red Pepper Flakes, Salt and Pepper
Boil potatoes in salted water until soft. Combine half cooked potatoes, half white beans, and coconut milk into a food processor. Blend until smooth. Lightly saute onion and bell pepper in a little vegetable stock and add minced garlic last. Add the mixture from the food processor and more cooked potatoes, white beans, and coconut milk in stock pot. Add seasonings to taste.
Cajun Beans
![20170602_121110[1]](https://infinitegeography.com/wp-content/uploads/2017/06/20170602_1211101.jpg?w=698)
Ingredients
- Pinto Beans, drained
- Finely Chopped Onion, Bell Peppers (any color), and Garlic
- Seasonings: Cajun Seasoning, Garlic Salt, Salt and Pepper
Lightly saute onion and bell pepper in a little vegetable stock, add garlic to saute last. Add all other ingredients.
Spaghetti / Goulash
![20170617_220836[1]](https://infinitegeography.com/wp-content/uploads/2017/06/20170617_2208361.jpg?w=698)
Ingredients
- Finely Chopped Onion, Bell Peppers (any color), and Garlic
- Canned Tomatoes (Petite Diced, Tomato Paste)
- Jar(s) of Premade Spaghetti Sauce
- Spaghetti or Elbow Macaroni
- Seasonings: Italian Seasoning Mix, Garlic Salt, Salt and Pepper
Lightly saute onion and bell pepper in a little vegetable stock, add garlic to saute last. Add tomatoes, sauce, and paste. Cook pasta separately in salted water. Add cooked pasta to stock pot. Season to taste.

Pingback: Colorado Trail 2017 – Infinite Geography
This is exciting. I have been wanting to experiment with this. Thanks for the inspiration!
My pleasure!
great! but it does not say how much of each to use.. like 4 cans of beans or 1 can of corn, hahha.. nice recipes.. looks delicious =)
I left it a little open ended so you can decide your own quantity. We just kept popping cans of beans open until we filled our 6 qt stock pot and seasoned to taste. 😋
Hi, what is tye shelf life for the dehydrated meals?
I’ve read conflicting answers to this question across the internet ranging from a year to forever. Vacuum sealing only helps the meals stay good longer!
I was just wondering why you decided to add chia seeds to your breakfast. Like what nutritional benefits does it provide?
My boyfriend and I are going to start the CT in about a month and we’ve been dehydrating nonstop! Great ideas here 🙂
Chia seeds add healthy fat, protein, and dietary fiber and are am excellent way to boost nutrition on the trail! We’ve been adding a spoonful of peanut butter to the breakfasts too! Good luck with the dehydrating and with the trail! Hope you love it as much as we do 😀
Awesome! I’m doing the same right now 😀
Looks like a lot of work but i’m sure it will be nice to have on trail!
So far so worth it!!
I noticed you don’t use any meat in your recipes. Is that just personal preference or does meat not dehydrate well?
Personal preference! I know plenty of people dehydrate meat as part of their meals. Leaner meats will dehydrate better than fatty meats.
Pingback: Appalachian Trail vs Pacific Crest Trail – Infinite Geography
Pingback: Every Ounce Counts – The Importance of Ultralight Backpacking – Infinite Geography
Pingback: Living the Life I Love – Adventures of 2017 – Infinite Geography
Pingback: Talking About Walking Giveaway
Pingback: Powered by Plants – Vegan Backpacking on a Thruhike
Should each tray be vacuum sealed as a single portion?
When I make these, I measure a cup and a half of cooked food per tray then vacuum seal each tray separately. Portion size will vary per individual but this has worked well for me. If I make chili, for example, I also carry instant rice to add in the backcountry so I’ll end up with a little more to eat than just the cup and a half of chili. I hope this helps!
I like ramen. Ok, ok, I know. Not healthy. But I like to put veges in mine. Cabbage, scallions, celery, carrots, which I have dehydrated. (I’m new to dehydrating). I’ve learned that the carrots and celery take longer to rehydrate than the other stuff. Would it be smarter to keep those ingredients separate to start rehydrating before the other ingredients?
Ha, I like ramen too! I would keep the veggies separate since they will need to soak / cook much longer than the noodles 😊
Hi! Late to this post but excited to be here! My husband and I plan to start our AT thru hike in March, and we definitely want to prep food in this way with our dehydrator! Love how it looks like you could cut your bags to size – what food savor do you have/ film do you use?! That aspect is new to me, would LOVE a youtube tutorial on even just the packaging aspect. Any info is helpful, thanks!!
Ooh so exciting! We used a basic food saver vacuum sealer and a roll of heavy duty vacuum bags (both available on Amazon). Using a vac sealer is a super easy process. Just seal one side, load with food, then seal the other side and trim the edges. I always cut a small slit in the trim to easily open the bag without a knife. Just be careful not to cut the vac seal potion and pop the bag. Let me know if you have any other questions! Best of luck on your adventure!!
They look like hearty, great recipes! Thank you.
Any tips on rehydrating these foods? Would it be enough to pour in hot water and let the food soak (without simmering)? How long would it take?
Would any of the recipes work with cold water? I think I read somewhere that people start cold soaking a long time before being ready to eat. They carry with them the soaking food as they hike.
Hey Alina!! It took a good 20+ minutes of boiling in the pot for these to come out soft and yummy. Our portion was for 2 people jumbo sized meals, so might take a little less time for a solo meal.
I havent experimented with just soaking in boiling water, but I really think they need the time and heat in the pot on the stove.
I have done my fair share of cold soaking different foods on the trail. I havent tried it on homemade meals, but i would not recommend these for cold soaking. I really doubt the beans would get soft from cold soaking. Cold soaking works well for cous cous, Ramen, instant mashed potatoes, and packaged dehydrated refried beans. Might be a fun experiment to try to make a homemade version of the dehydrated refried beans. For cold soaking any food, try to avoid ice cold spring water.